iCIS Intra Wiki
categories: Info - Support - Software - Hardware | AllPages - uncategorized
MercatorRegistration: Difference between revisions
| Line 20: | Line 20: | ||
To register your presence you: | To register your presence you: | ||
# open the shared calendar for your section's virtual room (one-time setup) and check the availability; | # open the shared calendar for your section's virtual room (one-time setup) and check the availability; | ||
# invite the virtual room as an attendee to your appointment. | # invite the virtual room as an '''attendee''' to your appointment. | ||
'''Important:''' Invite the virtual room as an attendee to your appointment, but not as a location. We don't add the room as a location, because a real room can only be booked once, but our virtual room can be booked multiple times. So we instead handle our virtual room as a virtual attendee for which we can schedule multiple meetings at the same time. | '''Important:''' Invite the virtual room as an attendee to your appointment, but not as a location. We don't add the room as a location, because a real room can only be booked once, but our virtual room can be booked multiple times. So we instead handle our virtual room as a virtual attendee for which we can schedule multiple meetings at the same time. | ||
Revision as of 10:58, 7 September 2020
Access to Mercator I for iCIS staff
Effective August 31st, we broaden the provisions in place for usage of our building. Access to Mercator I is limited to 10 people per section, at any time. Plan and register access via the Exchangeagenda (instructions below).
We count on your cooperation to reduce the administrative overhead and make the best possible use of the available capacity.
General instructions
All ICIS staff have access to RU calendar. There's a wiki page about Exchange that describes how to use your calendar.
You register your presence in Mercator I by booking an appointment in the Exchange calendar and invite the virtual room for your section. Please don't book whole day appointments, as they make it more difficult to see how many people are present at a given moment. Unfortunately, the limit of 10 people per section is currently not automatically enforced, so we ask you to check this yourself before booking the virtual room. The management assistants have been asked to monitor fair usage of the building capacity, please follow up their instructions.
To register your presence you:
- open the shared calendar for your section's virtual room (one-time setup) and check the availability;
- invite the virtual room as an attendee to your appointment.
Important: Invite the virtual room as an attendee to your appointment, but not as a location. We don't add the room as a location, because a real room can only be booked once, but our virtual room can be booked multiple times. So we instead handle our virtual room as a virtual attendee for which we can schedule multiple meetings at the same time.
Below you'll find detailed instructions for different clients.
Instructions Outlook Web App
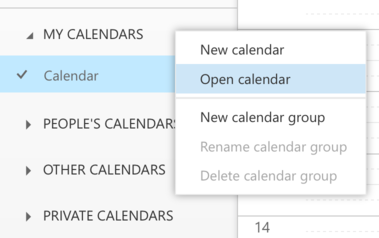
- Right-click on "My Calendars" in the left panel and choose "Open Calendar".
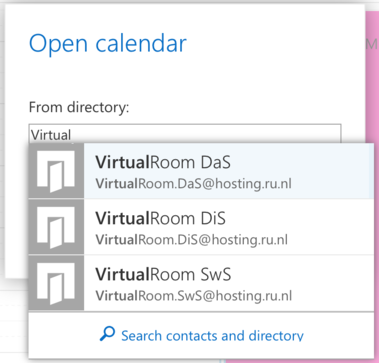
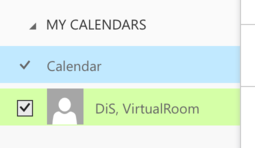
- Type "Virtual" in the "From Directory" text field, choose the virtual room for your section from the pop-up menu and use the "Open" button.
Invite Virtual Room
- Create a new appointment in your calendar by clicking on the time that you want to start;
- Enter a name for the event, for example "Work at Mercator I".
- Choose the begin and end time of your presence;
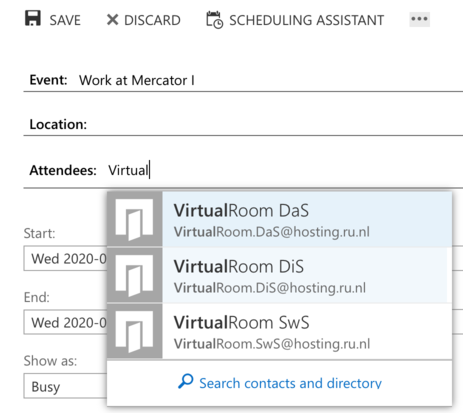
- Invite the virtual room by typing "Virtual" in the "Attendees" text field, choose the virtual room for your section from the pop-up menu;
Note: Don't add the room in the location field, because a real room can only booked once, but our virtual room can be booked multiple times. So we instead handle our virtual room as a virtual attendee for which we can schedule multiple meetings at the same time. - Choose "Show as: Free" to prevent this appoimnent from blocking other appointments;
- Select "Send" in the upper-left corner to make the appointment.
Instructions Outlook
to be done
Invite Virtual Room
to be done
Apple Calendar
to be done
Invite Virtual Room
to be done
Thunderbird
to be done
Invite Virtual Room
to be done


